Breathing New Life Into Early X-Trans With Capture One

Following up on my last post, I’ve been going through some old RAFs in Capture One. The difference I’m seeing compared to what I can get out of Lightroom is shocking. Check out this terribly underexposed sunset image, captured with an X-E1 in 2013.

Original.jpg

My exposure compensation was still set at -2.0 from a previous shot, so I’m certainly not hoping to get anything useful out of that shot, but look at the difference in what I’m able to pull out of the exposure in Capture One 12 compared to Lightroom Classic (or whatever the hell they’re calling it these days).

Now check out this crop.

Capture One sharpening settings are at their defaults ( I would typically reduce them slightly). In Lightroom, I used the oft advised high Detail slider at 85, and relatively low Amount of 25. Any higher on the amount and Lightroom starts sharpening noise. Increasing the Luminance Noise Reduction blurs detail.

From the farm buildings, the detail in the foliage, the bizarre 8-bit-looking grass, Lightroom’s limitations with these older sensors is astounding. No wonder I decided to shoot JPEG.

Fuji have come a long way with their sensors, and I have already acknowledged that Lightroom started doing a lot better when X-Trans III came out. The point is, if you’ve decided to make the jump yourself and you’ve got some older X-Trans 1 RAFs in the archives,1 it could well be worth reprocessing them in Capture One.→

Luckily I got my exposure set a little better on my next attempt.

DSCF1015-RAW (DR400)-1500px.jpg
  1. Or you’re simply happy with an older body. For a lot of people, 16 megapixels is plenty. ↩︎

Switching to Capture One

It finally happened. After years (half a decade, even) of being unsatisfied with Lightroom’s handling of X-Trans RAF files, and an underlying dissatisfaction with my workflow workarounds, I’ve completely made the switch from Lightroom to Capture One Pro 12→1 for all of my personal2 photography.

The transition period was actually quite short, just a couple months or so. I started out importing all my current RAFs into Capture One, while maintaining my Lightroom library and doubling up my asset management in case I decided to move back. Well, my last import was only to Capture One. Those, and future images will likely never see Lightroom.

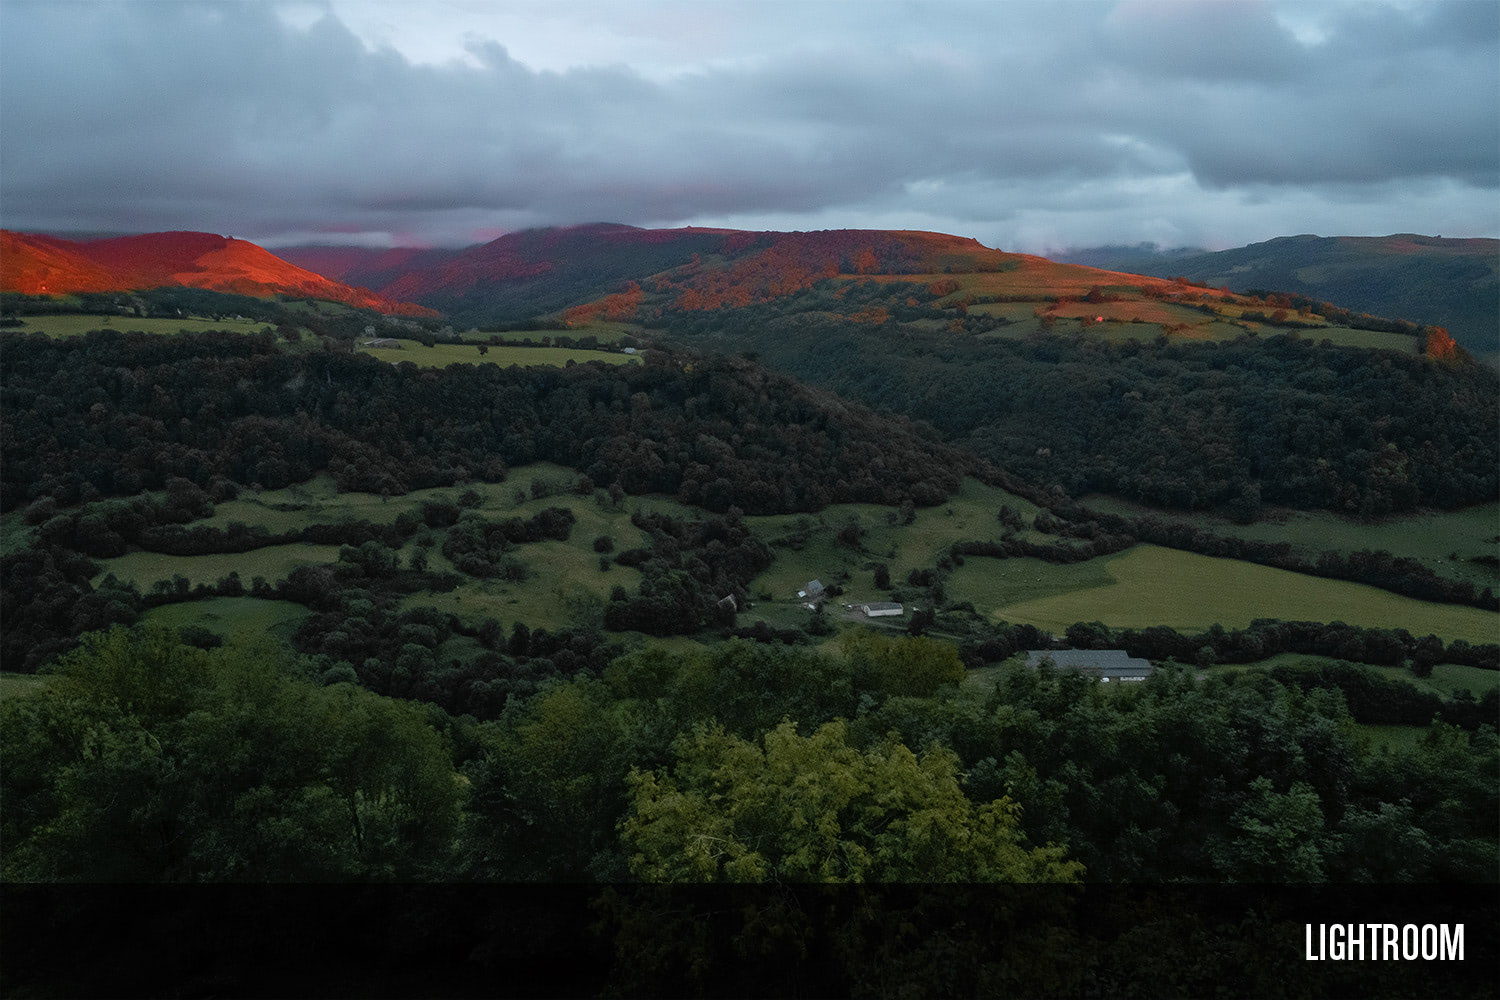
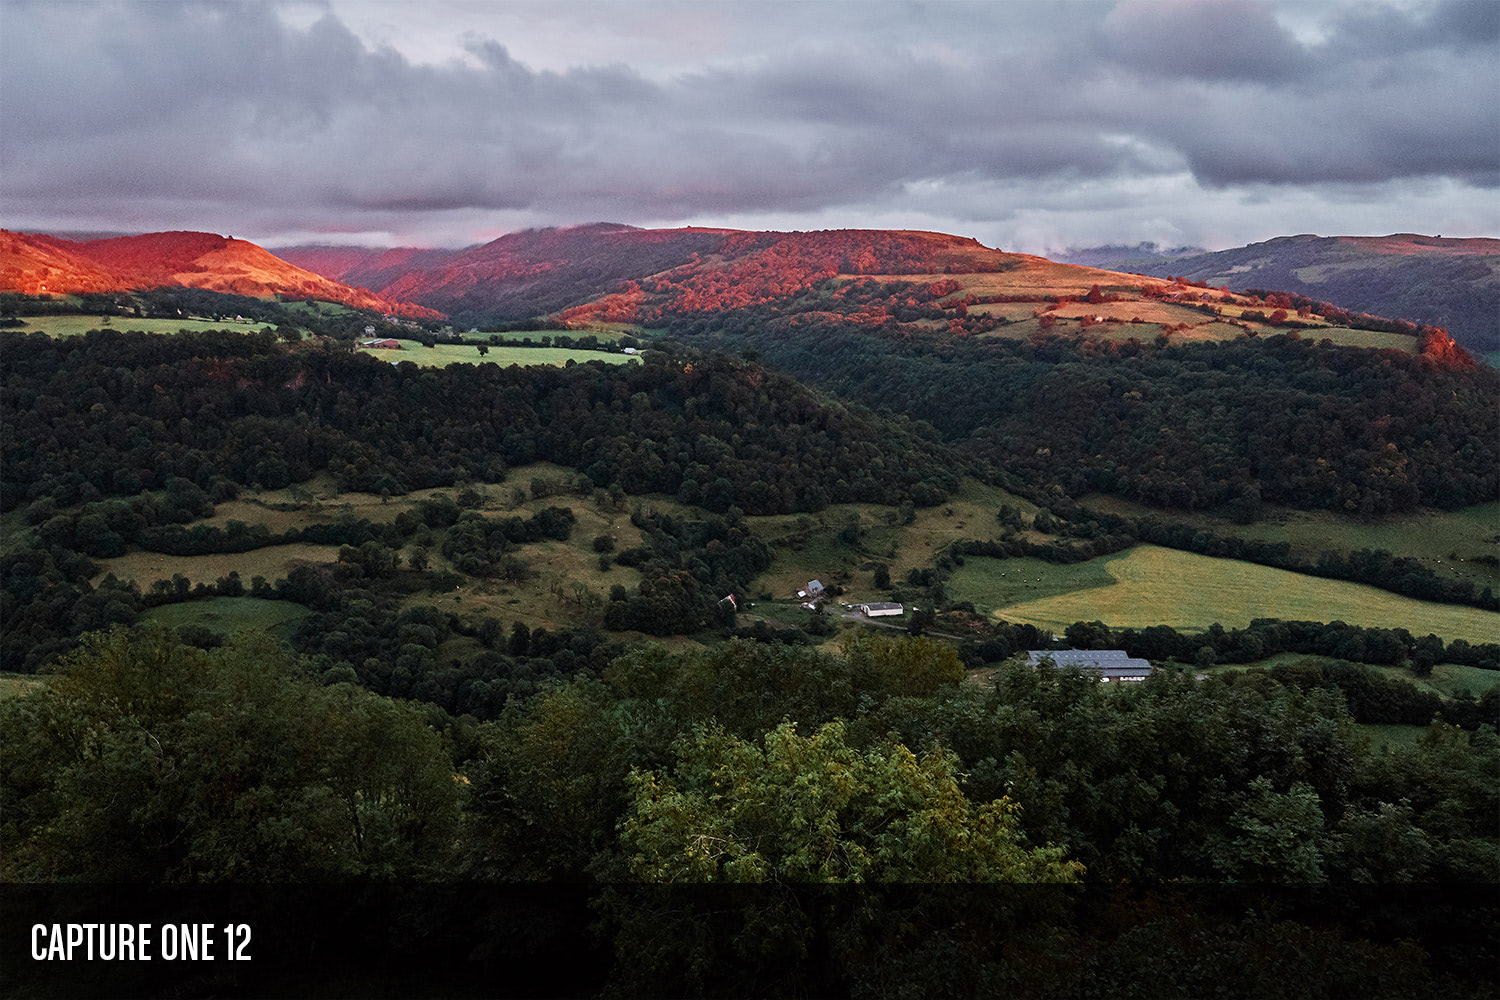
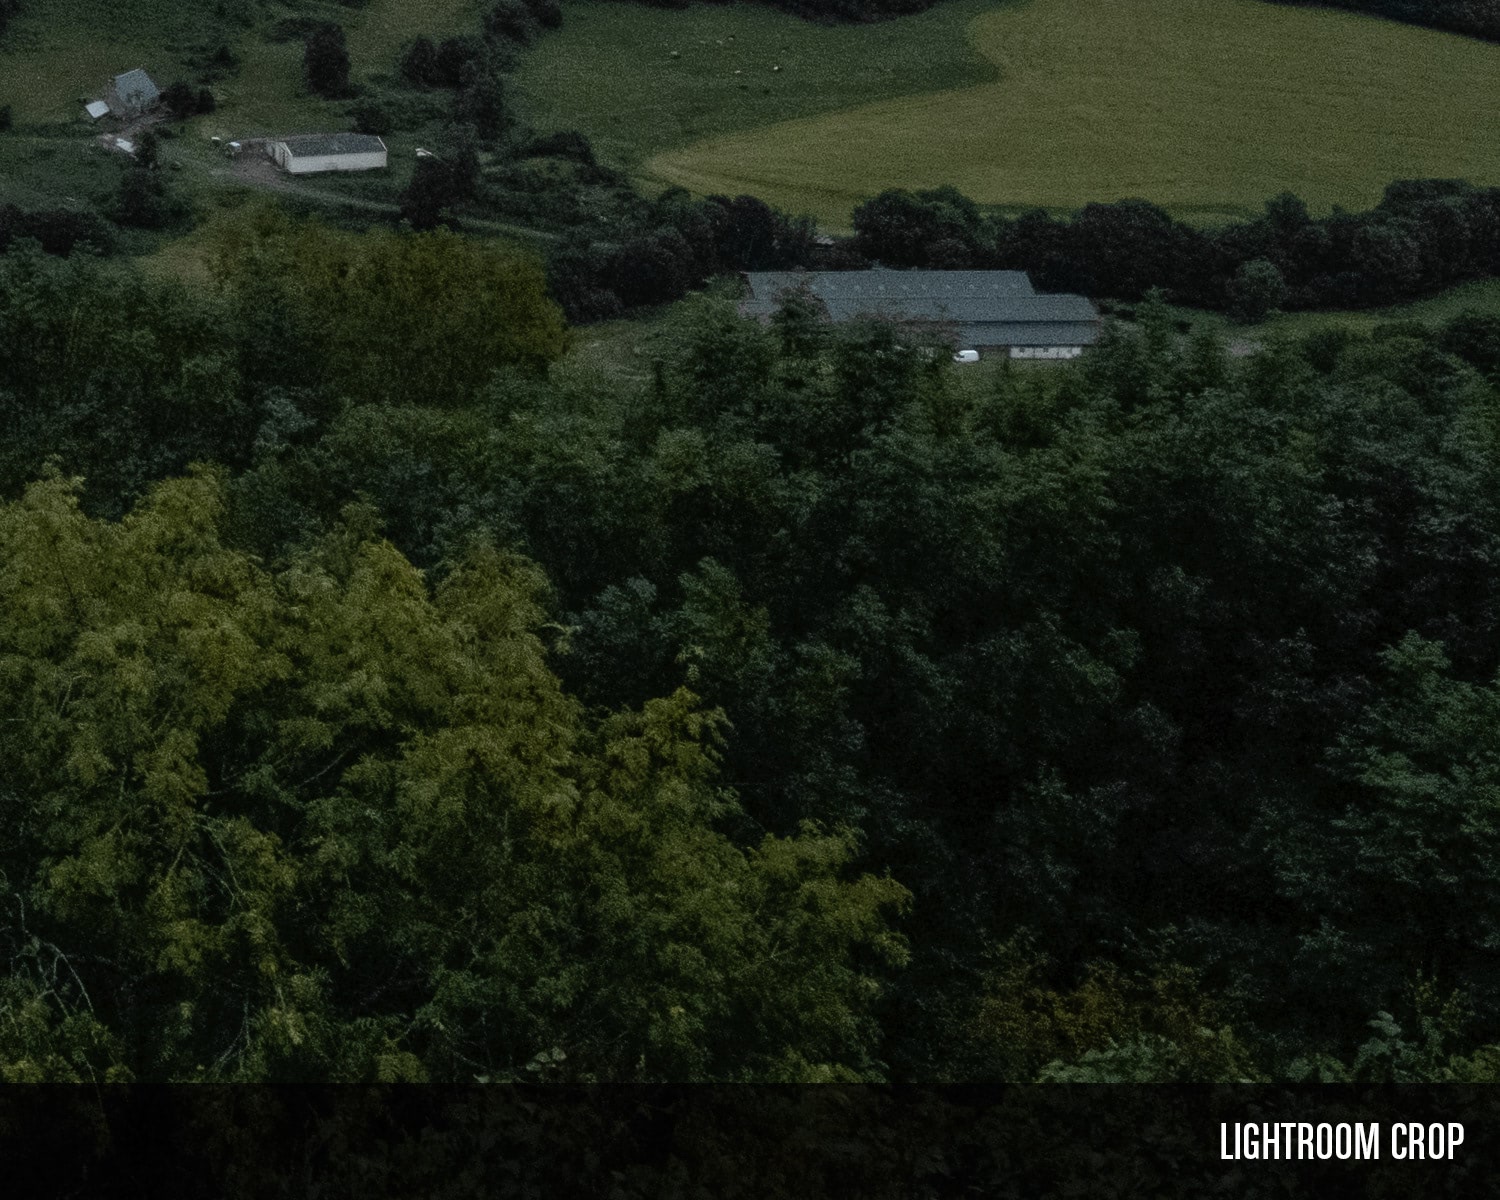
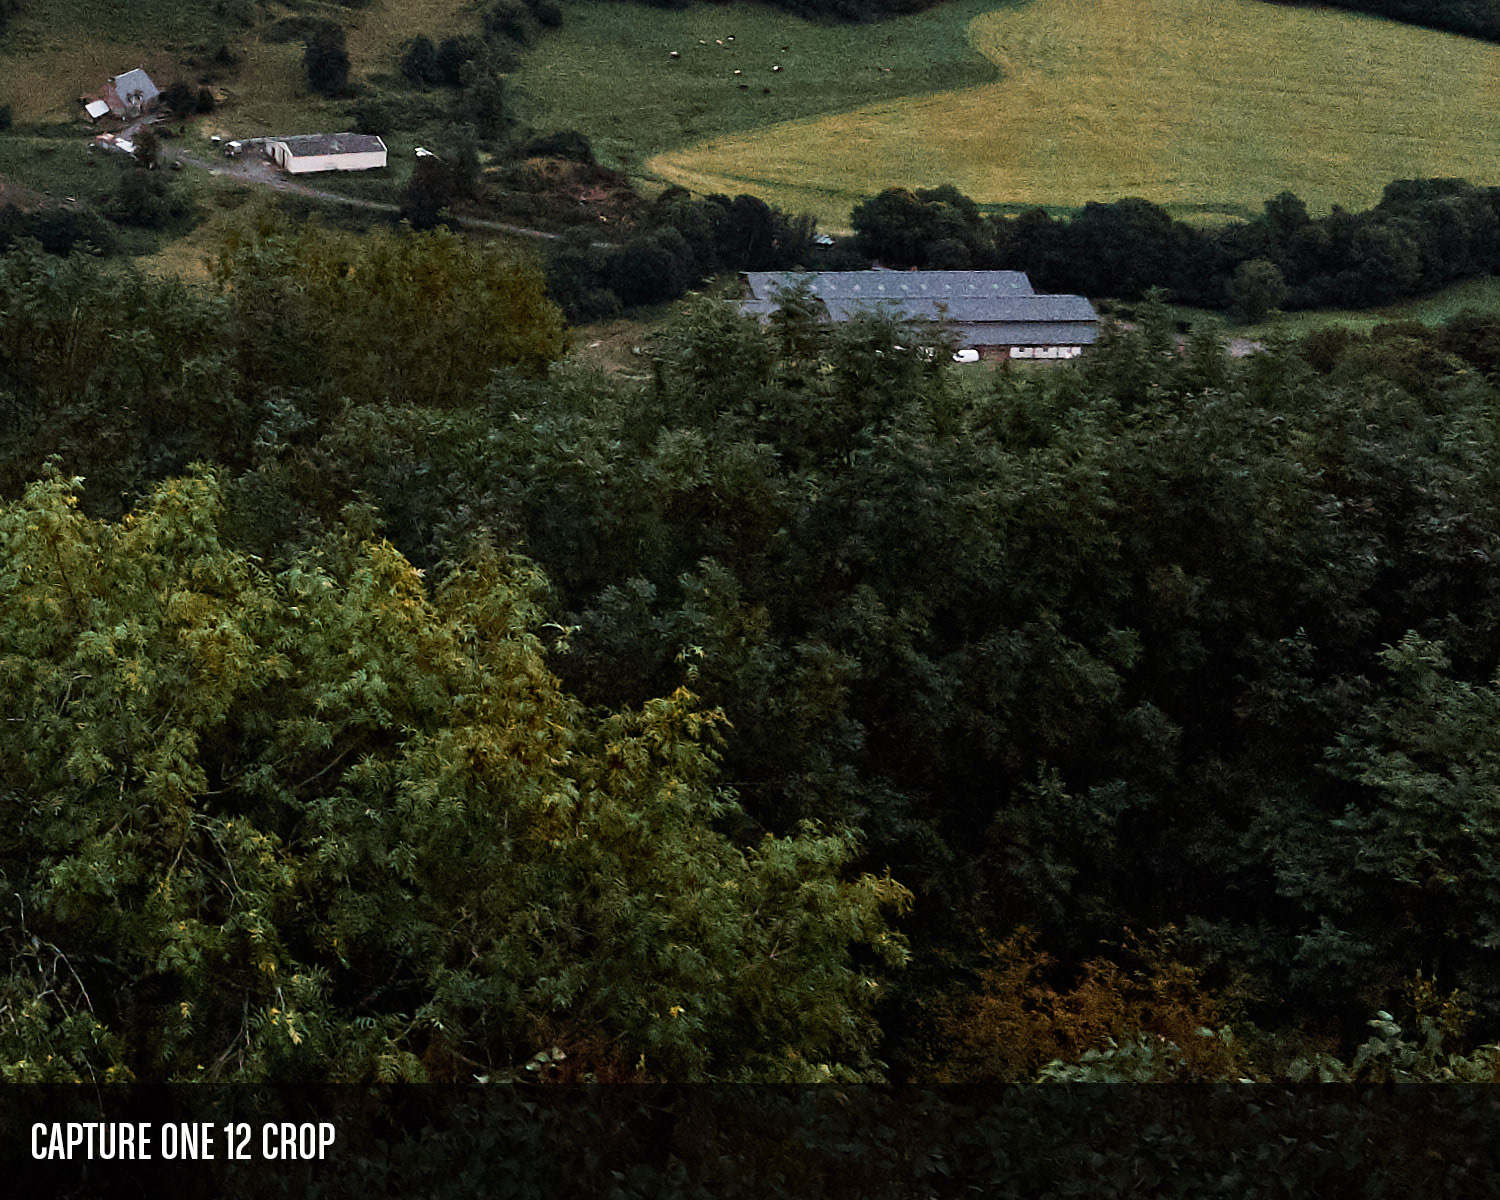
Adobe has certainly made some progress since the first and second generation of X-Trans, but it is the definition of “too little, too late” in my book. In my hopelessly dated RAW Converter comparison, I concluded that Capture One delivered superior results. A year later when Lightroom 6 came out, I left little doubt that Capture One produces cleaner images with better detail.

So why did I wait so long?

Honestly I’m not sure, but version 12 of Capture One does have some additional niceties that have made the switch easier, and Phase One’s commitment to Fujifilm cameras really helps.

Back to the RAF

The other big change to my workflow is I’ve gone RAF-only for my personal photography. One big reason for this is Capture One’s interpretation of Fuji’s Film Simulation Modes and lens correction profiles are so good, I don’t feel the need to capture both RAF and JPEG. Unlike Lightroom, Capture One imports my RAFs with the Film Simulation Mode I captured the image with applied automatically. This gives me the best of all worlds; I can make creative choices while I’m shooting, I can totally change my mind about those choices later, and I don’t have a second set of files I need to reference what I was thinking when I captured the image.

Another big reason is exposing to the right with the ETERNA Film Simulation Mode is a fantastic way to get the most out of your exposures, but that’s another article.

Have you heard about these things called presets?

I never got too deep into the preset world in Lightroom. There were just too many, and many seemed dreadfully overpriced, all too similar3 and would break or not adapt when Adobe updated their rendering engine. I feel like that market has settled down a little, and the better quality preset shops have added (or are starting to add) Capture One versions as well.

It can be easy for presets to become a crutch, but they can also just as easily be a starting point for discovering your own style. I’m enjoying editing photos more than I have in years, so clearly it’s the right thing for me right now.

Have I looked back?

Hardly. I miss some things like the dedicated slider for Dehaze once in a while, but in truth you can get similar results that are arguably more natural using the Luma Range mask, an absolutely stellar feature. Speaking of sliders, I also find myself reaching for the Blacks and Whites sliders, but I’m falling deeper in love with Levels and Curves as a result. Ironically, while I loved Lightroom’s separation of Blacks, Shadows, Highlights, and Whites, when I go back to Lightroom for an old photo, I find myself missing the Brightness slider.

Lightroom’s Library module is quite a bit more robust than what Capture One has in my experience so far. Filtering photos quickly is vastly superior in Lightroom. Capture One’s commercial photography origins likely didn’t call for the kind of filtering that’s available in Lightroom, but I love, neigh need to be able to quickly view photos taken with a particular lens, at a specific focal length, and certain apertures, etc. Even if I didn’t have this website, I do still like being able to see which images came from a certain lens without having to create a bunch of Smart Albums that clutter up my Library/Collection View. This may or may not matter in your workflow, and I’m certain with more time and perhaps a tweak or two to my own workflow, things will get faster in this area.

I appreciate how efficient Capture One’s UI is, but I do wish I could hit Command J to add or change the information that’s up on screen. I also used to resist the vertical image browser, but on my iMac, it actually allows my image to be displayed quite a bit larger.

I miss Selects (or Picks) and Rejects in Capture One, but I’ve adapted to colour labels which have more efficient keyboard shortcuts, especially if you’re on a full size keyboard.4

Performance wise, I’m not having much trouble on my 2015 27 inch iMac. I’ve run into the occasional memory crash when waking the computer up, but never while actually working. Capture One seems to use more of the computational resources available to it. My processors are actually working hard enough that the fans spin up on occasion.5

The image is what matters though, and even after all these years, Adobe just can’t compete. Maybe you can get similar results using the new Enhance Details, but for now the cost in time and storage space is way too high when there’s software that can do much better with RAFs natively.

Should you switch?

If you shoot RAFs, you should seriously consider it. And there couldn’t be a better time because Capture One Pro 12→ is 50% off for just a couple more days. I can’t say that pricing didn’t also help ease the transition. I went straight to Pro. Layer Editing is more than enough reason, but the Advanced Colour Editing is no joke. I grabbed the 6 Style Packs which bumped the total savings up to 60%. All told, I’m really happy with the change.

  1. The Fujifilm Edition, natch. ↩︎
  2. The Lightroom library I use for product shots for this site will still be used for the time being as I only shoot JPEGs for those. ↩︎
  3. Wedding, engagement, and pregnancy photos from 5–10 years ago are likely to be pretty easy to pick out. ↩︎
  4. Plus key = Green for Pick, Minus key = Red for Reject, Asterisk = Yellow, and I’ve set the Equals key to Clear rating. ↩︎
  5. This is a good thing as far as I’m concerned. I want software to use the processors I paid for. It does make that silent iMac Pro I’ve been waiting for an upgrade to more appealing. ↩︎

Adobe, Enhance Details, DNG Files, and Film Simulations

Way back on episode 40 of the FujiLove podcast—which, if you are reading this site and you like podcasts, you should probably be subscribed to—Jens and Billy Luong of FujiGuy fame had Product Manager Sharad Mangalick from Adobe on to talk about updates to Lightroom and ACR, and specifically the new feature “Enhance Details”.

Enhance Details

For those who don’t yet know, Adobe’s own dialogue box says:

“Enhance Details uses machine learning1 to improve details and reduce artifacts in most RAW files. The enhanced results will be saved as a DNG file.

It’s a computationally intensive process that performs best with a fast GPU. The estimate Adobe gives me on my Late 2015 5K iMac for a single image is 5 seconds, and that seems about right. What’s really unfortunate is the file size of the resulting enhanced DNG version of a 24.6 MB compressed RAF out of an X-H1 is 117.7 MB.

The results out of this feature would have to be pretty spectacular for me to consider taking on that kind of additional data.2 I’m seeing some decent results in my own limited testing, but weirdly, the Enhance Details dialogue preview totally betrays what the feature is actually capable of in some cases. I had one image that looked significantly worse in the dialogue box preview—more false detail, crunchy texture where there shouldn’t be—and I was ready to call Adobe out on it. After I actually rendered the image though, it did look a fair bit better than the default rendering.

It’s fantastic that Adobe are putting in the time and effort to support X-Trans—they could easily have made this a Bayer-only feature since they obviously support many more Bayer cameras than they do X-Trans. I’m looking forward to the day this feature is part of Lightroom proper, vs. behaving more like a plug-in, but one comment from Sharad on the podcast really jumped out at me:

“Fuji’s proprietary RAW file, the RAF, it doesn’t have an openly documented specification that Adobe can use to add the additional information.”

This is the result of Adobe having to create a separate (huge) DNG files. An obvious question is why doesn’t Fuji open up the gates enough to allow Adobe to write this additional information to the RAF/a sidecar file so we don’t need to go through this cumbersome workflow? I’m sure Billy has asked Japan this question, and either his hands are tied or there’s a really good reason that he agrees with.3 Either way, I wish we got an inkling as to what the issue is there.

Another obvious question is why are other applications able to generate better results without having to create a separate file? What does Phase One know that Adobe doesn’t? Adobe talk about having to balance performance with resolution, but Lightroom isn’t exactly blowing away the competition when it comes to performance with RAF.

For the time being, unless you’re all in on Adobe and a Creative Cloud subscription maxes out your budget allotment for photo editing (which is perfectly reasonable), a strong case can still be made for better, more specialized tools like Iridient Developer for those really important or really challenging images.

Film Simulation Modes

In the back half of the interview, the trio speak about Film Simulation Modes and how Adobe works with Fujifilm to ensure they have the same understanding of how each Film Simulation Mode should affect an image. This has been the official story for years now, and back when it was first told, Adobe’s interpretation of Fuji’s Film Simulation Modes were nowhere close to what we saw out of camera. To my eye, they’ve gotten better, but my recent experimentation with Capture One 12 suggests Phase One is quite a bit closer. Indeed, Phase One’s interpretations of Fuji’s Film Simulation Modes so far has been strikingly good. I’m on the cusp of switching to Capture One for much of my X-Trans processing needs for a few reasons, not needing to create whole separate files to get better detail out of my images and Film Simulation Modes are two big ones.

  1. What doesn’t use “machine learning” these days? Anyone else already tired of that? ↩︎
  2. In the early days of DNG, I remember reading about photographers converting to DNG wholesale with some going so far as to then delete the original RAW files. I’m awfully glad I never considered this kind of asset management. ↩︎
  3. Billy also does a remarkable job navigating these waters. He’s in a tough spot having to balance transparency and trade secrets, but he comes across as really quite genuine. Having spoken with Billy myself quite a few times in the past, I can say he truly does take user feedback to heart, and when he says he’ll take something back to Japan, he means it.

    I’m really digging this addition to FujiLove. It can come across as an advertisement at times, but it’s counterbalanced with honest upgrade recommendations to listeners who could perhaps skip a generation. ↩︎

Lightroom 6.1 / CC 2015.1

Adobe Lightroom.png

I originally set out to write up a quick blog post about the relatively marginal differences in how the two latest versions of Lightroom handle sharpening. We’re still in limbo while Adobe “collaborates with Fujifilm in investigating methods to improve fine detail rendering and overall edge definition,“ after all.

It somehow morphed into what I hope was an interesting exercise in confirming what the optimal methods of sharpening in Lightroom are (Amount vs. Detail, which slider will emerge victorious???), the difference between Clarity and the new Dehaze feature, as well as whether or not Lightroom is best tool for the job of extracting detail from RAFs.

If you’re up for a fairly long post detailing subtle differences via loads of fancy new before and after slider images, check out my latest Extras piece. It focuses on detail for now, but I hope to add an examples of the “reduced colour blur” once I find a suitable image.

Lightroom 5.7 vs. 6.1 for X-Trans

The “Best” X-Trans RAW Converter

Aperture vs Capture One vs Iridient Developer vs Lightroom vs LightZone vs Nik Sharpener vs OnOne vs Photo Ninja.jpg

Perhaps my most fussy article to date, I’m going to great lengths to determine what the “best” RAW converter is for X-Trans sensors. As it stands, I’ve only examined how these applications treat a typical wide angle image shot with a FUJINON XF 14mm ƒ/2.8 on an X-E1. I will add more images as time permits.

See for yourself what the best RAW converter for X-Trans is.

On Adobe, and Lightroom for iPad

Today marked the release of Lightroom 5.4 which delivers the long awaited Fujifilm X-T1 support, and Film Simulation Modes for RAFs via the Camera Calibration panel. Awesome stuff. I plan to throughly analyze their profiles and compare them with their in-camera counterparts as soon as possible.

Today also marked Adobe’s announcement (or confirmation) that Lightroom will be available on the iPad for Creative Cloud subscribers only. This comes as little surprise, and yet I can’t help wondering what the hell they are thinking. It seems to me they are leaving money and users on the table by choosing (or sticking with) a pricing model they hope will encourage Creative Cloud subscriptions.

At the end of 2013, Adobe announced 1.4 million subscribers to Creative Cloud. That’s 1.4 million + people who will get Lightroom for iPad “for free.”1 Maybe Lightroom on iPad will keep some of those subscribers loyal,2 maybe some people will begrudgingly subscribe in order to get it.3 I won’t, and I think they’ve passed up an app pricing structure that would make them more money, make their customers happier, and be more future-proof. I’ve been pondering this morning about what that might be. One idea involves the dreaded in-app purchase (IAP).

“This app offers in-app purchases”

It’s not uncommon for top-tier apps on iPad to sell for $19.99. Twenty bucks is a fair price for an app like Lightroom, but that could be cut down to $15, $10, or even $0 because camera and lens profiles would cost anywhere from $1 - $5 each.

Done.

Things could be kept simple ($5/camera, $1/lens), but there’s tremendous flexibility in this pricing structure too. “Consumer” gear could be less expensive, “Pro” gear more expensive. Exotics or lenses with complex distortion correction profiles could also command a premium.

How many Creative Cloud subscriptions does Adobe realistically hope to gain making Lightroom for iPad subscription-only? Compare that number with how many photographers would happily shell out for Lightroom as a standalone application while being able to purchase camera and lens profiles as they see fit? I’d have happily paid Adobe $5 for the Film Simulation Modes they released for Fujifilm cameras today. Don’t want or need ’em? Then you’ve got the built-in Adobe profile already. The nice thing about Fujifilm is those same profiles would work across every camera that shares the X-Trans sensor, but let’s get back to Adobe for this post.

This model gives customers the freedom to purchase what they want, and more importantly what they actually need, something Creative Cloud fails at miserably. It’s also self-sustaining since we photographers can be a fickle bunch, generally speaking, many of us collect lenses, and we love our upgrades. Maybe Adobe would only ever get $7 less Apple’s cut from some photographers, but 70% of $7 is better than 100% of nothing.

I’d upgrade to a 128GB iPad just to have this imaginary version of Lightroom with me when I go on vacation. It would be an immediate backup of my photos to the iPad I’d have with me anyway, and I could start the selecting, rejecting, and editing process while still on vacation or on the flight home. I could see a lot of photographers doing the same for jobs.

What about Lightroom for the desktop?

Maybe it’s time the desktop version moves to a pricing structure like this one too with a reduced core applicaiton price. I’m personally not a fan having 100’s of MB of profiles I don’t need on my computer, and if DxO can implement a decent profile download system, Adobe sure can. We’d just have to hope they wouldn’t build it in Flash.

Of course the pay once and get everything model we’ve enjoyed to date with the desktop version of Lightroom would be ideal, but I’m trying to see this somewhat from Adobe’s side, and acknowledge that additional and recurring revenue might be a necessity.

The future of photography?

Perhaps most importantly of all, it protects Adobe from a potentially huge threat from Apple. Not strictly from Aperture, but from the iPhone. With any luck, Aperture for iPad is on its way. Maybe it will be announced alongside the iPhone 6 which presumably will feature an even better built-in camera. Now consider the iPhone 6 (or even a simple iOS update) allows owners to capture and manipulate RAW data with immediate support for it via the newly released Aperture. Given Apple’s track record these days, Aperture would be free. Now you’ve got the most popular camera on the planet’s RAW files editable via Apple’s competitively-priced one-time fee (or free) iPad app, and Adobe’s subscription-only app, once they get around to supporting the iPhone’s RAW files. Or, Adobe could just sell the iPhone profile for $2 to a ton of “iPhoneographers” who want to keep using Lightroom on the desktop.4

Apple isn’t known to add complexity the way adding RAW support certainly would. However, they are heavily focused on the photography market in general, and it seems there should be a very easy way to make RAW data available to users who want it via Aperture for iOS and the Mac, while keeping those who aren’t interested blissfully unaware. If photography continues to be an area Apple hopes to dominate, RAW support of some kind ought to be in their future. Just imagine all those VSCO presets being applied to sensor data rather than JPEGs.

Conclusion

I can’t be totally sure the pricing structure I outlined above would work, or if it would ultimately even be profitable after the content delivery system is in place. It’s really just musing with some griping for good measure. What I do know is Adobe’s actions are getting frustrating, and are starting to reek of hubris. I’m curious what it would take for them to wake up. Extraordinary apps like Pixelmator are already putting a dent in the once invincible Photoshop. If I wasn’t so deeply entrenched in the industry I am (advertising, marketing, etc.), I’d have dumped Photoshop for Pixelmator already.

Adobe’s apps have become uncontrollably bloated and hopelessly inconsistent. Lightroom was widely regarded as they only app they were still “getting right.” I think that sentiment will change with photographers to some degree today, and that’s a shame.

  1. Anyone who believes this needs to reassess their definition of “free.”
  2. I doubt this number is very high. Most people who subscribe do so out of necessity.
  3. This number is probably even lower.
  4. Or on Windows for that matter.

Fujifilm X-Trans: Before & After

I’ve added a new page under “Extras” in the main navigation for “X-Trans Before & After.” It will be an ever-evolving page showing quick screen grabs of RAFs and JPEGs with the “Before / After” view mode active in Lightroom to show just how much dynamic range can be pulled out of the X-Trans sensor, and how much JPEGs can be altered in post.

I’ll maintain this page until DxO figures out how to run their tests on X-Trans sensors. ;-)

X-Trans Before & After