Long Exposure Photography Tips
I’ve always been drawn to long exposure photography. The silky water, dreamy waterfalls, clouds that smear the sky into leading lines, or even just shooting in candlelight at low ISOs to capture noise-free images. You might think you need a super steady, and expensive tripod and equally expensive filters in order to achieve these looks, but if you already have a camera, you can get into the long exposure game for very little money.
Tripod
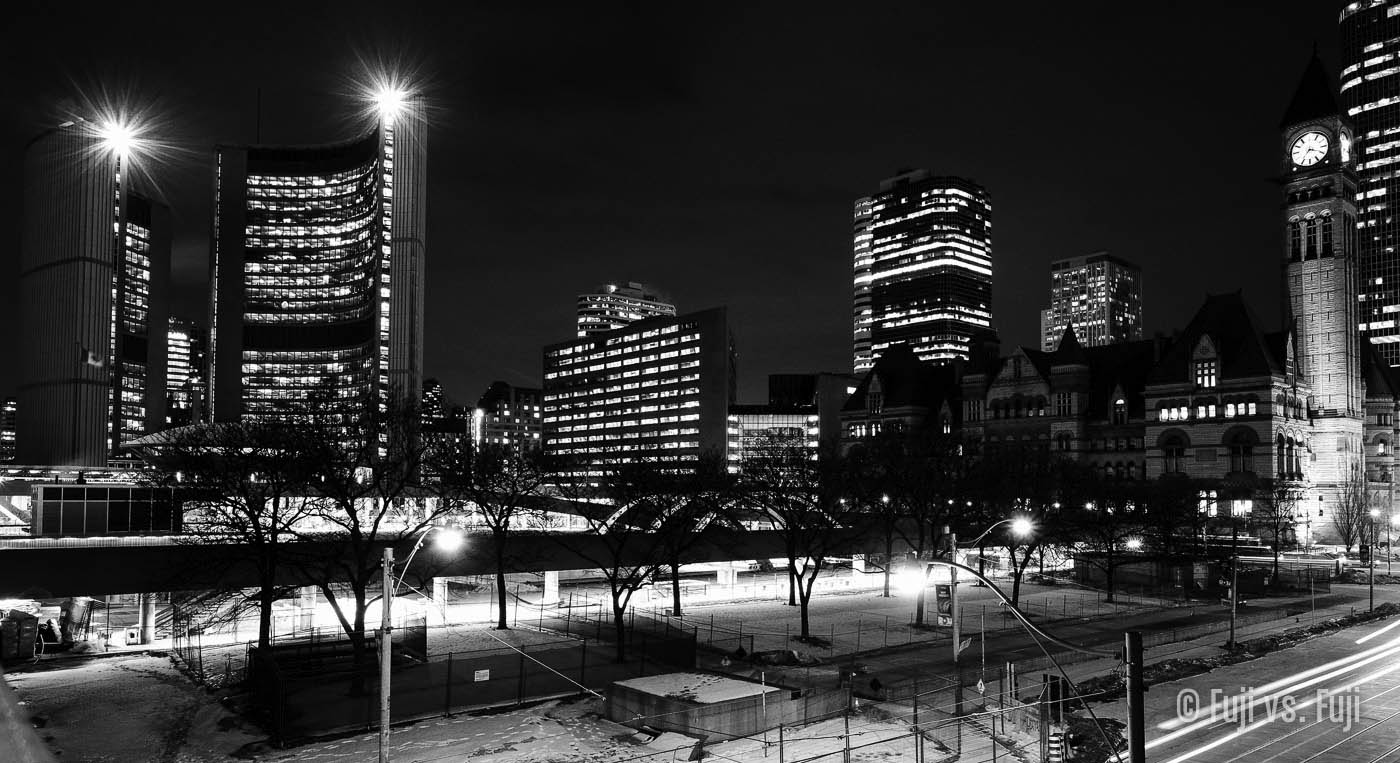
Nothing beats a good tripod. I have a great one from Really Right Stuff. One that was great for my DSLR setup, and (barely) travel-worthy, and the other might be the best support system you can get for a mirrorless kit. I’ll have much more to write about both those tripods, but the fact of the matter is you can get started with long exposure photography without a tripod of any kind. In the image below, I set my camera down on a nice sturdy cement wall, set my shutter release timer to two seconds, and stood by while the camera did it’s thing.
To avoid the annoyingly conspicuous flashing countdown light, hold the “DISP” button to engage “Silent Mode.”
In this case I had to be careful about setting my camera down on the cement as I didn’t want to scratch my camera and lens. I’m personally nowhere near as concerned with bumps and scrapes on gear as I used to be,1 but I try not to be careless, or scratch things needlessly. Keeping gear pristine is important to some of you, and I totally get that. For you, there’s the ridiculously small and happily affordable Joby Gorillapod Micro.→ This thing is so small, you could easily leave it permanently affixed to your camera(s). It will keep the bottom of your camera and your lens off scratch-inducing surfaces.
The Gorillapod Micro can be a little bit fiddly, especially if you don’t get it on tight enough. I used a screwdriver to tighten it a little more than I could with my fingers, and now I can fold the legs out and spin them around without the ’pod coming loose. Take care not to over-tighten if you do that though. A key works just as well too, and you might want to keep one handy as sadly the battery door on the X100 or X-E cameras doesn’t quite open all the way with the Gorillapod Micro attached.

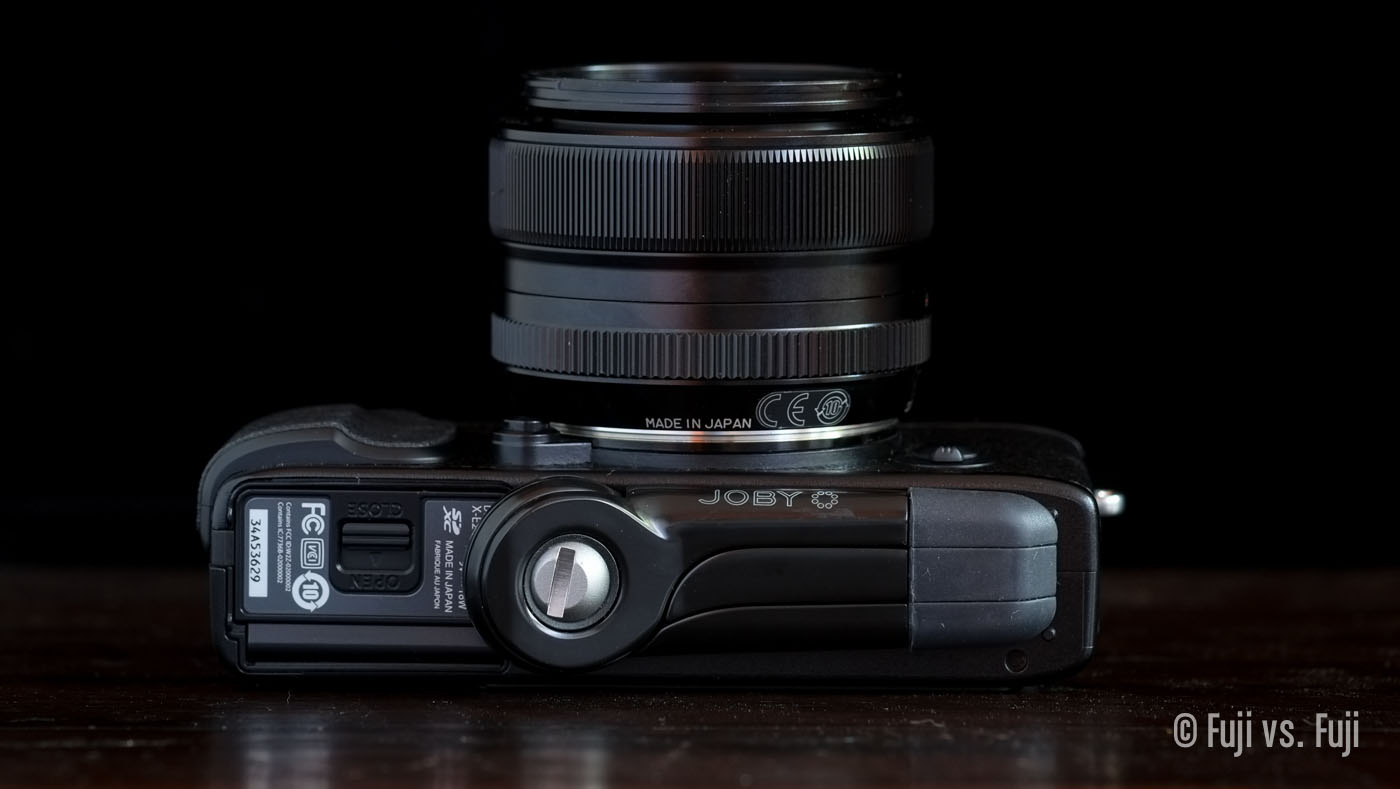
The Joby Gorillapod Micro 800 folds neatly away
You might be thinking another obvious choice would be one of Joby’s regular Gorillapods.→ I bought one of those for a small DSLR years ago and returned it the next day. If you really need to have your camera cling to a tree or something, it’s great. For surfaces that are approaching flat, I find them frustrating, and for the size, I’d rather have a proper tripod.
If you really get into long exposure photography, you owe it to yourself to make setting up to create the images you want as effortless and enjoyable as possible. For that you’ll likely want a proper tripod. To start though, it’s not hard to be out of pocket very little, if anything.
Mechanical Cable Release
Another worthwhile, inexpensive purchase is a mechanical cable release. I purchased a few of these a while back and tested them so you don’t have to. These cables fold up small, weigh almost nothing, and save you having to set the timed shutter release, which resets itself every time the camera is turned off. Plus they look retro, and anything that looks retro is cool.

Can’t complain about the size of this long exposure package
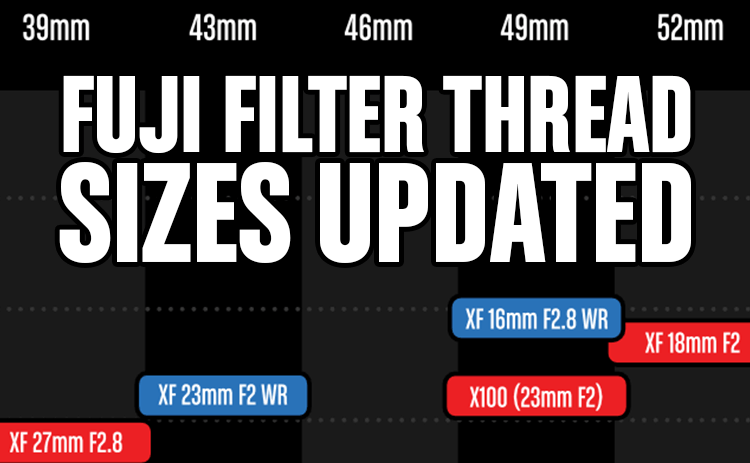
Filters
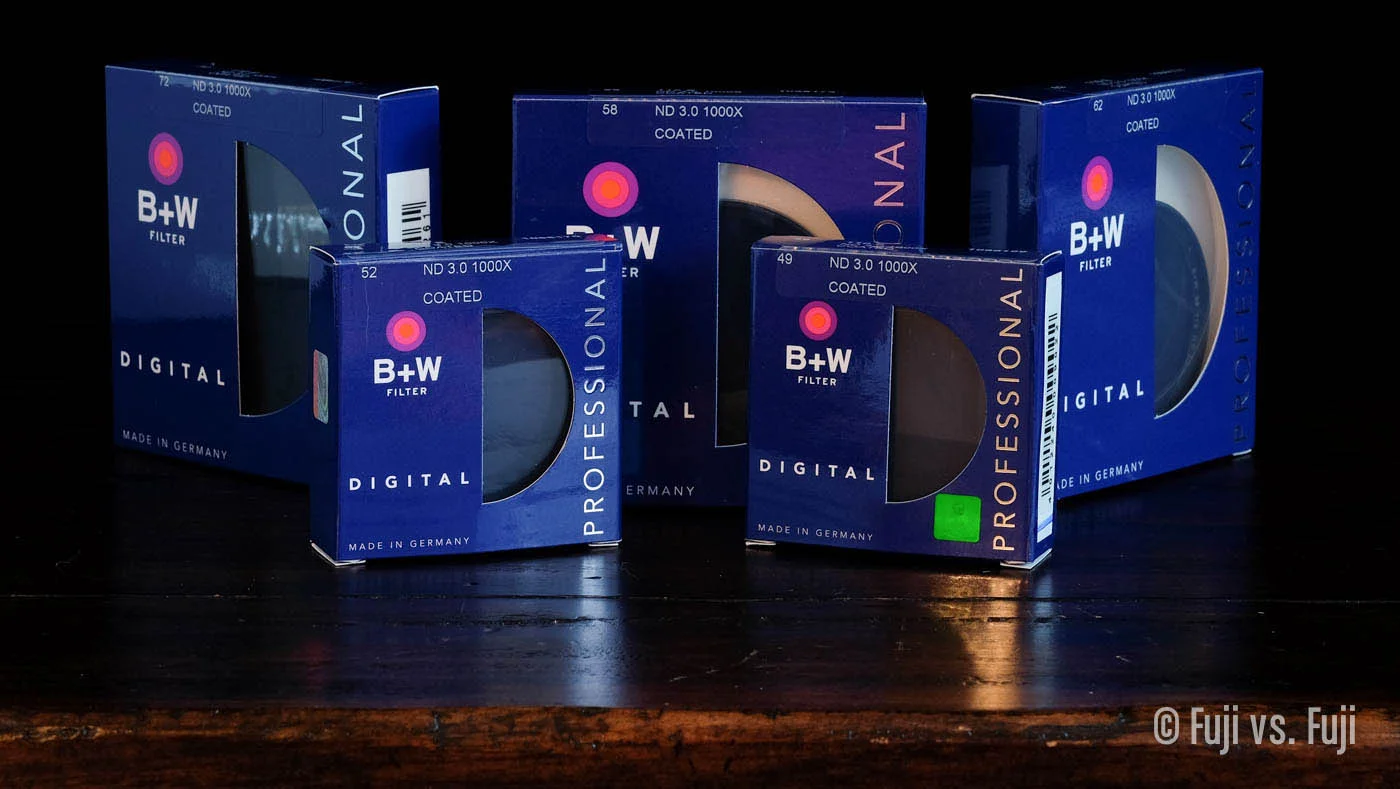
Next up, the item every camera sales-person on earth will desperately try to sell you. Only problem is, they’re usually trying to sell you filters you probably don’t really need. For long exposure, you want a neutral density filter to slow that shutter speed down. My strategy has been to buy a 10-stop B+W ND 3.0 1,000X filter for every filter thread size I need. I easily could have gotten away with at least two fewer filters, but I have conflicting preferences when it comes to setting up to shoot:
- I dislike fuss during setup. This means transferring filters from one lens to another as seldom as possible.
- I also dislike increasing the size of a lens by leaving a step-up ring on the front of it.
For those without these idiosyncrasies, you can purchase a few step up rings and employ the following filter strategy:
* Denotes step-up ring
I personally pass on the extra coatings for neutral densities. It more than doubles the price. B+W cites “glare reduction and troublesome stray light” as primary reasons for their expensive “MRC” coating. I cite the hood that came with your lens as a much more affordable alternative. Your hood will also protect your filter from scratches, negating the need for that 8th coating. Buy a yourself a Rocket Blower and a soft brush to remove any dust that ends up on your filters.
Also note that these filters come with a colour cast. The 62mm and 72mm filters I recently received have what B+W refers to as a “warm” colour cast. It’s very warm. Shooting JPEG is possible, but you’ll want to capture a RAF along with a JPEG, just in case.
Variable ND
I’ve been on the brink of purchasing a variable ND too many times to count. At the time, Singh Ray were the only game in town and there were some who called their density claims into question. They’re also very deep filters and very expensive. Hoya and Tiffen make more affordable alternatives, but I still have not pulled the trigger on a variable ND. Here’s why.
It’s pretty rare that I want to shorten my exposure so I’ve gone with the densest of neutral densities, and bought more of them for more flexibility in my focal length. More often than not I’m already pushing a lens to diffraction-laden apertures, not to mention shooting with pretty wide angles with lots of depth of field, so if I need the shutter speed to be quicker, I’m happy to open the lens up a stop.

It would be a real shame in increase the size of this ultra compact LE photography package
Lee Filters
I was pretty excited when Lee released their new smaller Seven5 version of their filter attachment set. The problem I have with these systems is they increase the size of your kit a fair bit. Take the X100S for example. It would be a shame to add so much size to such a small camera. Compare that with a tiny 49mm filter and there’s really no contest unless you really want to shoot graduated NDs as well.2
What’s the best Fujifilm camera for long exposure photography?
The answer might surprise you. If you like the 35mm focal length, the X100S is an incredible long exposure camera because of its built in ND filter.3 That means that with a 10-stop ND filter, you can get thirteen stops of light reduction with only a single piece of glass. What does 13 stops get you? Well, you can shoot towards the midday sun for 20 seconds at f/8. That can be pushed to a full minute-long exposure with a smaller aperture. And with Fuji adding adapters, the X100S has become even more flexible. Note that while the WCL-X100 uses the same filter size as the X100, the TCL-100 is 67mm.
Need an interchangeable option? Well if you shoot in poor weather, the X-T1 is your only option. Otherwise, take your pick. As I discovered, even the relatively ancient X-E1 is a perfectly capable long exposure camera.
Sometimes, longer ≠ better
I grabbed the images below while testing for my 10-24mm f/4 vs. Primes article. I captured a few different exposure lengths. The short one is 26 seconds. This smooths water out nicely and gives the clouds a bit of a dream-like effect. I also tried one option stopped right down to f/22 which doubled my exposure to 56 seconds. I stated above that it’s rare I was to decrease my exposure time, but this is an instance when the longer exposure is actually weaker. The water isn’t much smoother, but the direction of the wind was pushing the clouds across the frame from left to right.
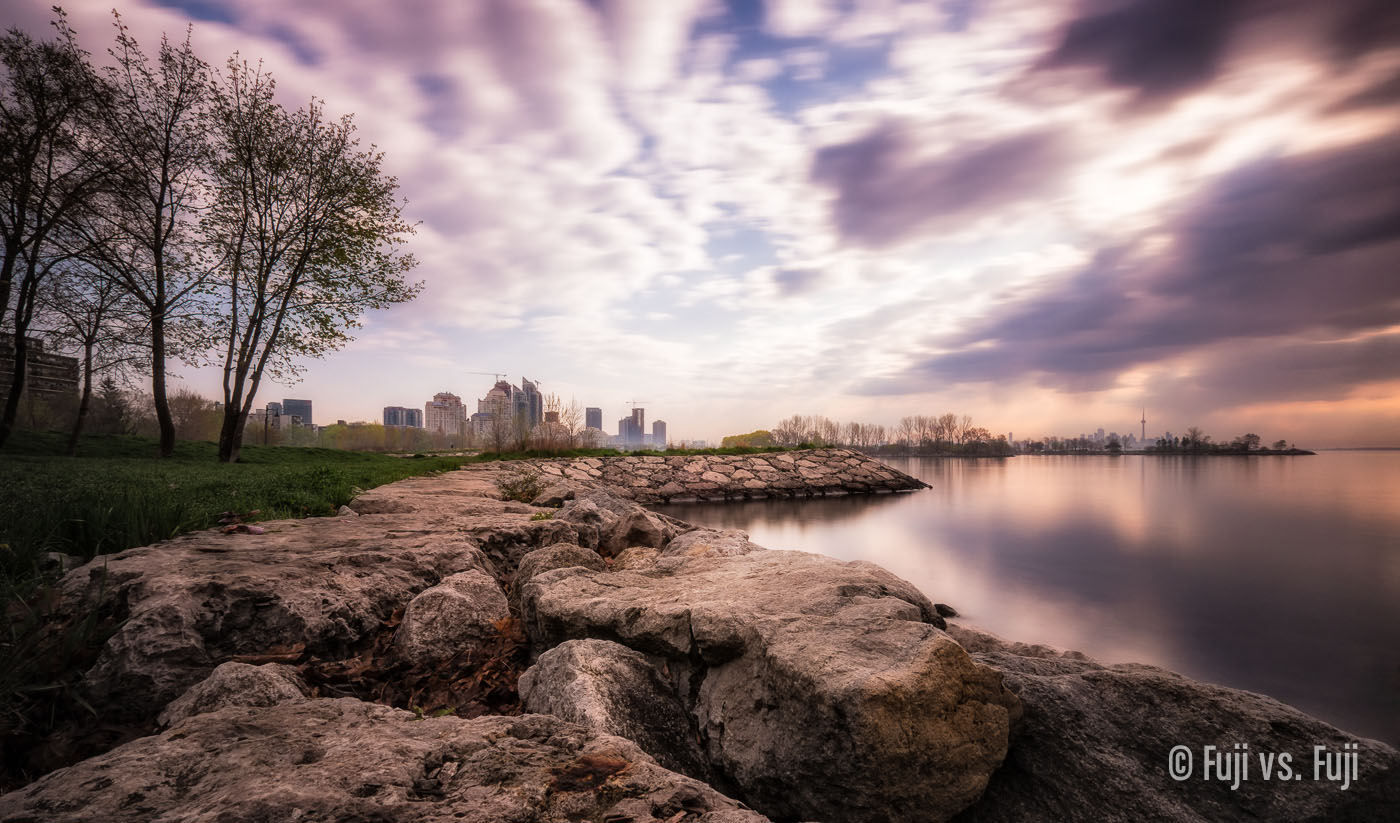
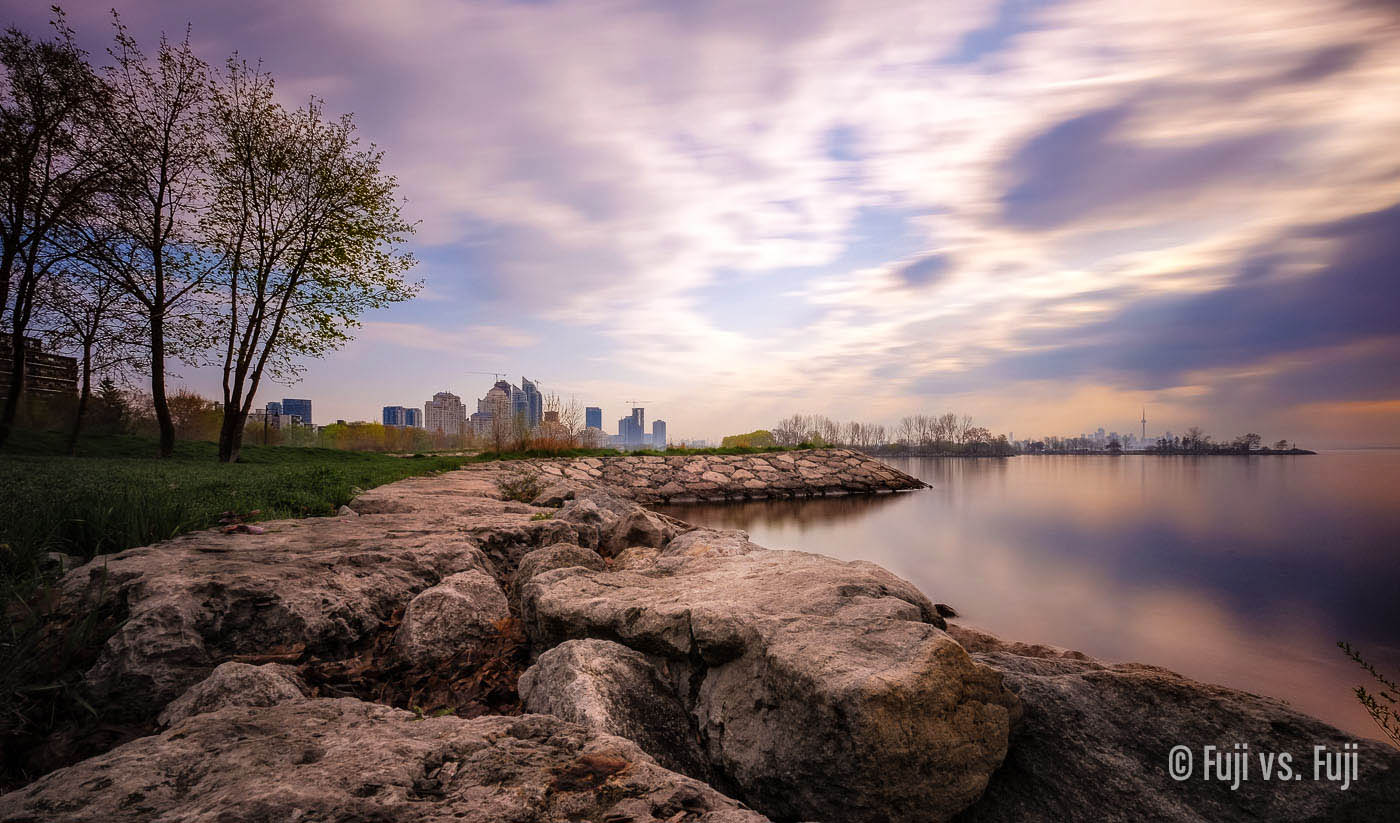
In my opinion, the breaks in the clouds of my select created some nice leading lines that are less effective when blurred more. Compostion and the direction of clouds both should work in harmony, so in this case, the longer exposure is actually weaker.
The last comment I’ll make is long exposure shouldn’t become a crutch. Just because you keep your shutter open longer, that doesn’t mean your photo is going to be great. It’s a cool effect, but it should not be used to the exclusion of good light, and good composition. Outside of practice, testing, and learning when anything is fair game, use long exposure to enhance a photograph, not to make a photograph.
- Gear I have no intention of selling anyhow. ↩
- Personally, I’d bracket the exposure, and merge it in post rather than fuss with NDs. It isn’t terribly often I’m shooting a horizon that’s perfectly straight across. In my view, graduated NDs are a solution suited to film. Applying it to digital captures when a superior and technically easy alternative exists makes little sense. ↩
- It also might be the most versatile 35mm camera available. ↩